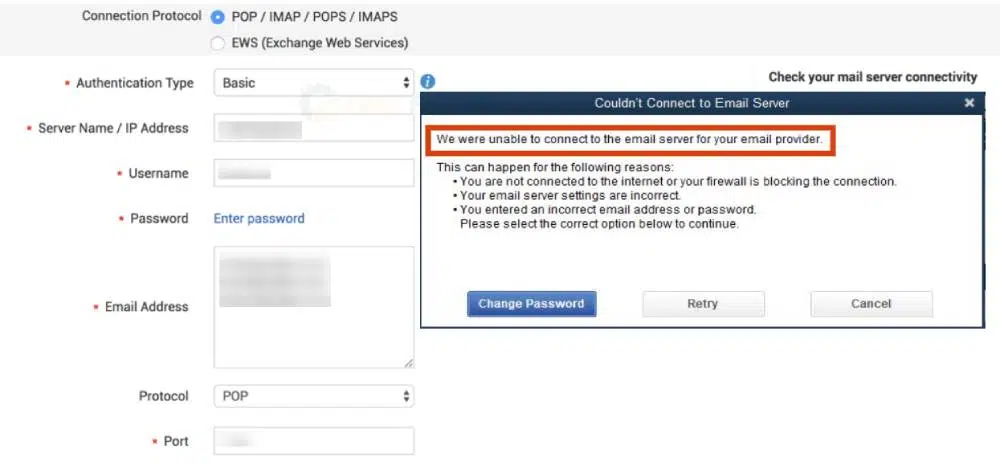
Fix QuickBooks Couldn't Connect to Email Server Error

The QuickBooks could not connect to the
Email Server error manifests when you are unable to send important company
related emails, which could actually have very serious consequences. Your
productivity may suffer, and it can even lead to the loss of important data
files. The most frequent cause of QuickBooks Desktop Webmail's inability to
generate invoices is attributed to the improper settings of the webmail
preferences.
Many users encounter the QuickBooks
Could Not Connect to Email Server Issue when attempting to send emails
using the QuickBooks Desktop application. Carefully read the instructions in
this article to learn more, and get rid of the issue quite easily.
Causes that provoke QuickBooks could not connect to the email server error
The following are some of the most typical causes
of the error:
- You tried to access your email account with a password or I.D. that was invalid.
- Your email server settings are incorrect.
- The QuickBooks Desktop application is not currently installed with the most recent version.
- You are not connected to the internet, or your internet connection is down or unavailable.
- Because of incorrectly configured Internet Explorer settings, QuickBooks connection to the email server is compromised.
Remedies to
tackle QuickBooks could not connect to the email server error
Method 1: Change
the Settings in Webmail Preferences
- First, launch the QuickBooks Desktop software.
- From the "Edit" menu, choose "Preferences."
- Next, select "Send Forms."

- Choose the email account from which you send emails under "My Preferences."
- Click on "Edit" right away.
- Next, choose "Edit Email Info" from the menu.
- After that, proceed to the section under "SMTP Server Details."
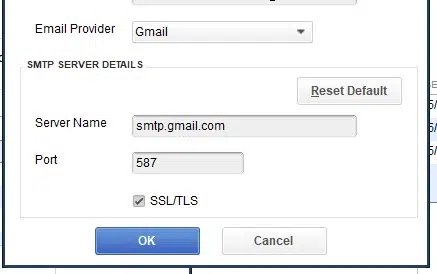
- Fill in the necessary fields with the correct server name and port number.
- For further information, look at the most popular email server addresses (POP3, IMAP, SMTP).
- Try sending an invoice via QuickBooks Webmail once again after saving the modifications to see if the problem has been fixed.
Method 2: Change
the I.E., settings to Default
- Click in the upper-right corner of Internet Explorer when it has loaded.
- In the top right corner, opt for "Internet Options" by tapping on the gear symbol.
- After that, choose "Advanced" from the menu.
- After that, you must choose "Restore Advanced Settings" option.
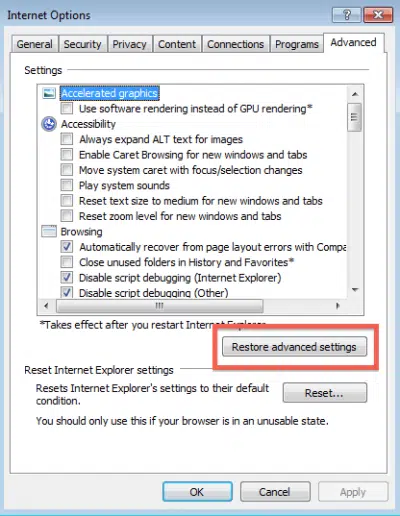
- Next, hit on "OK."
- Close Internet Explorer and send an email to see if the error has been fixed.
Method 3: Update QuickBooks
Downloading the newest version of
QuickBooks Desktop may fix the issue. To update
the QuickBooks program, the following procedures must be implemented:
- First, launch the QuickBooks Desktop application.
- Subsequently, hit on the "Update QuickBooks" option under the "Help" menu.

- Decide which updates you want to download immediately.
- Choose "Get Updates" from the menu after that.
- To complete the update process, choose "Update."
- Keep an eye out for the update process to be finished.
- When you're finished, submit an email to see if the QuickBooks program was able to resolve the issue.
This post provided information on the
appropriate fixes for the QuickBooks "Could Not Connect to Email
Server" problem. Contact our QuickBooks
error support team at any time to ask for technical support from our
specialists if the error keeps preventing you from sending emails.
You can use our website's "Live
Chat" feature or our Helpline number i.e., 1-800-761-1787 to get in
touch with us.


Comments
Post a Comment